The equal sign “=”

Some considerations for true beginners.

The equal sign “=” is a mathematical symbol (coined by Welsh mathematician Robert Recorde in 1557) of two parallel horizontal lines used to show that two expressions have the same value or are identical.
It is taught very early on in elementary school, but I don’t think the power of its deep meaning is explained well. At least, that’s what we can see from the difficulties experienced by slightly older students.

Equal means exactly equal. What is on the left of the “=” sign has the same value as what is on the right. So if there is a symbol on the left and a number on the right, in that context that symbol is worth exactly the amount indicated. And if two symbols are equal, they can be used interchangeably. Trivial, but a source of great doubt for those who have not fully grasped the basic concept.

From a formal point of view, the equal sign satisfies the following conditions:
– Reflexive Property: any value is equal to itself,  a = a
– Symmetric property: if  a = b  then  b = a  (the order of the expressions can be swapped without changing the truth)
– Transitive Property: if  a = b  and  b = c  then  a = c

– Substitution Property: informally, this just means that if  a = b , then  a  can replace  b  in any mathematical expression or formula without changing its meaning; formally, for every  a  and  b , and any formula  ϕ(x)  with a free variable  x , if  a = b , then  ϕ(a)  implies  ϕ(b) ; we can call this a function application.

Even without going into further detail, these simple properties allow us, for example, to solve first-degree equations directly. They allow us to invert formulas simply by adding or multiplying the same quantity on both sides of the equation. OK, taking care not to divide by zero.
If the unknown quantities (the so-called variables) are of a higher degree, things get more complicated, but the effectiveness of “=” remains the same.
A powerful little trick based on this is to use new variables to replace more complicated expressions or those with higher powers.
please, rate this post

References for laymen: an experiment to verify the law of falling bodies

The first observational measurements on the law of falling bodies were made by Galileo Galilei (1564-1642).
The famous law, considering the distance d traveled during the fall, is:
[1]    d = g t² / 2
where  g  is a constant representing the local gravitational acceleration (on Earth a mean value is  g = 9.8 m/s² ), and  t  is the time elapsed. In more easily observable terms, the fall time can be measured reversing the relationship  [1] :
[2]    t = √(2d/g)  .
Galileo predicted (inspired by what Domingo de Soto had already conceived in 1551) that all bodies follow this law regardless of their mass, studying rolling balls (rather than dropping them from the famous Tower of Pisa). However, everyday experience tells us that light bodies fall more slowly: this is simply due to the friction of the fluid in which they are immersed (e.g., air).

A rather expensive experiment was reported to have been carried out on the Moon, when a hammer and a feather were dropped and touched the ground at the same time (astronaut David Scott on August 2, 1971).
I propose the following more economical experiment: drop a coin that is not too small, for example a 2 euro coin, flat on its face, placing a small piece of paper, e.g. 5 mm in diameter, on top of it. A good height would be half a meter. You can observe that the piece of paper reaches the ground at the same time as the coin, which prevents the air from slowing it down.
You could also place the piece of paper in a transparent container that you then drop, but this would make it less clear to observe.

As a side note, it can be observed that a body in free fall accelerates until this acceleration equals the acceleration of gravity, due to the mass of the body (tipically the Earth) on which it is falling (possibly slowed down by air resistance, known as drag force). Once this is reached, the speed of fall, known as terminal velocity, remains constant. On contrary, a body falling in a vacuum never reaches terminal velocity because there is no drag force; it accelerates indefinitely as long as it is falling.

please, rate this post

References for laymen: how to use the sky to find your orientation

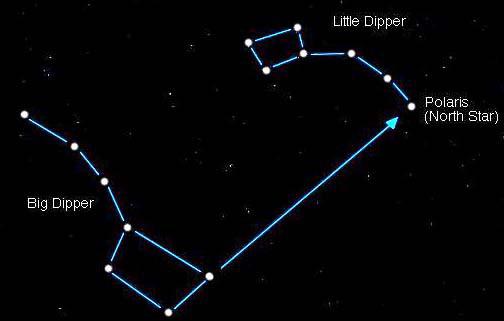
At night, everyone knows that North is roughly indicated by the North Star, which is easy to locate using the well-known asterism of the Big Dipper (and/or the slightly less prominent Little Dipper), see Figure 1.


Figure 1


During the day, however, the easiest direction to identify is South, which is accurately indicated by the Sun at its culminate point at noon every day of the year. Without having to wait for the culmination, knowing the time, you can estimate the direction of South by adding to the direction of the Sun at that moment (in the northern hemisphere, to the right in the morning and to the left in the afternoon) the angle missing to reach noon, considering 15° for each hour to midday (a full rotation of the Earth of 360° divided by 24 hours = 15°).
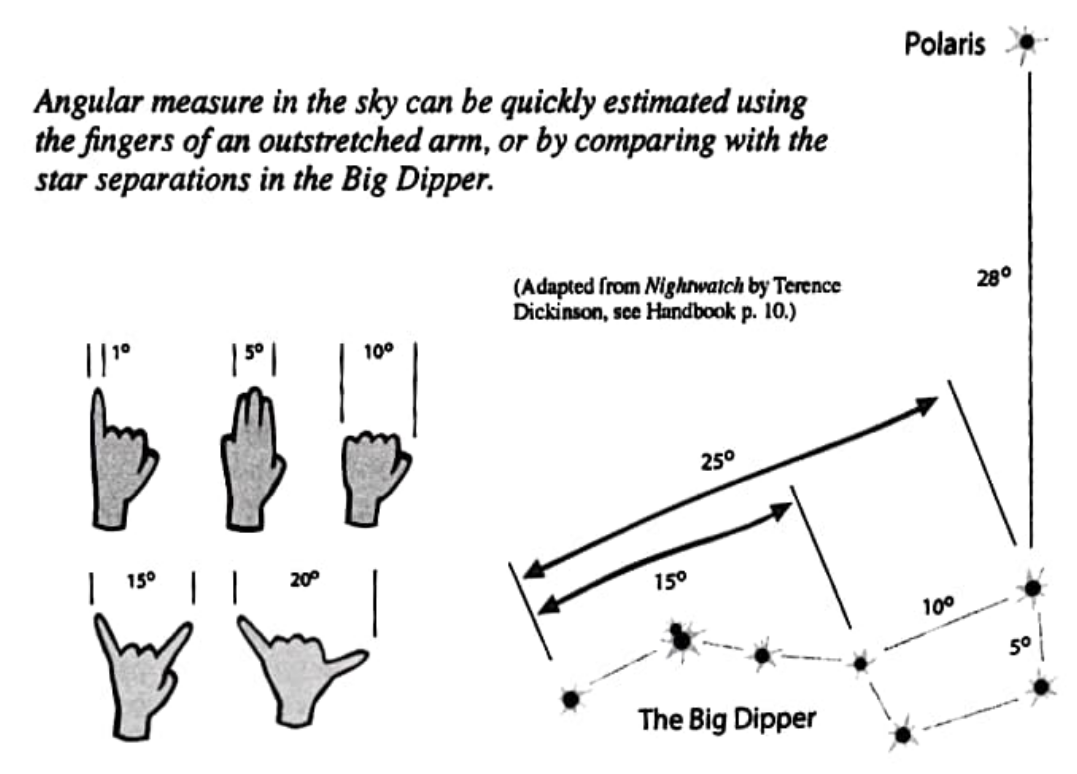
See Figure 2 for some practical references for estimating angles in the sky.

The height in degrees of the Sun above the horizon at its culmination point has been used for thousands of years to determine the observer’s latitude. Eratosthenes of Cyrene (276-194) used it to calculate the circumference of the Earth in a way that was effective for the knowledge of the time.

And again, thanks to knowing the exact ‘universal’ time, you can determine the longitude by converting the hours/minutes difference between the local culmination time of the Sun and the culmination time at longitude zero, taken as a reference, at the Greenwich meridian, into degrees. Obviously, east of this meridian, the culmination will be earlier, while west of it, it will be later.
This principle has also been known for centuries. However, it was possible to exploit it only when clocks of sufficient precision and reliability were built (at the beginning of the 18th century, mainly thanks to John Harrison, see for example Longitude, Dava Sobel, Walker Publishing Company, 1995).

To obtain accurate measurements, precision instruments (like a sextant) are obviously required (apart from the GPS available in every cell phone today!), but for a rough estimate, the above is sufficient.


Figure 2 – Easy reference for measuring angles in the sky (image credit: Nightwatch, Terence Dickinson)

angles in the sky

please, rate this post

References for laymen: angles in the sky

The positions and the sizes of cosmological objects observed as projected onto a background sphere are measured in degrees, starting from reference orientations. This brief note aims to highlight the observational ‘measurements’ of certain cosmological objects, measurements that are rarely taken into consideration.
We imagine a simple observation of the night sky with the naked eye…

An approximate idea of the measurements in degrees can be obtained from Figure 1. Other references are the measurements of the Sun and Moon, both approximately 0.5° (which is why we have total solar eclipses).
Since they cannot be seen ‘at a glance’ because they are not very bright, we do not realize that some cosmological objects are actually ‘large’ in the sky.


Figure 1 – Easy reference for measuring angles in the sky (image credit: Nightwatch, Terence Dickinson)


For example:
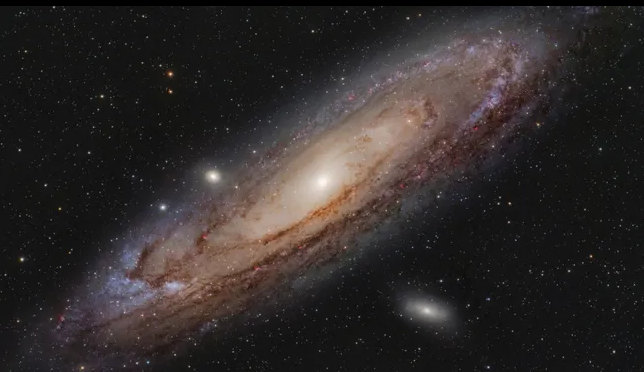
– the Andromeda galaxy (Figure 2) measures about 3° x 1° (so it is 6 times the size of the Moon)


Figure 2 – Andromeda galaxy (image credit: Westend61 via Getty Images)


– the Orion Nebula (Figure 3, the star-forming region closest to us in our galaxy, about 1350 light-years away) measures about 1° x 1° (i.e., twice the size of the Moon)


Figure 3 – Orion Nebula (image credit: NASA/ESA’s Hubble Space Telescope)


– The Large Magellanic Cloud (Figure 4, visible in the southern hemisphere) measures approximately 11° x 9° (i.e., it is 22 times wider than the Moon).


Figure 4 – Large Magellanic Cloud (image credit: Spitzer Space Telescope by NASA)

LMC


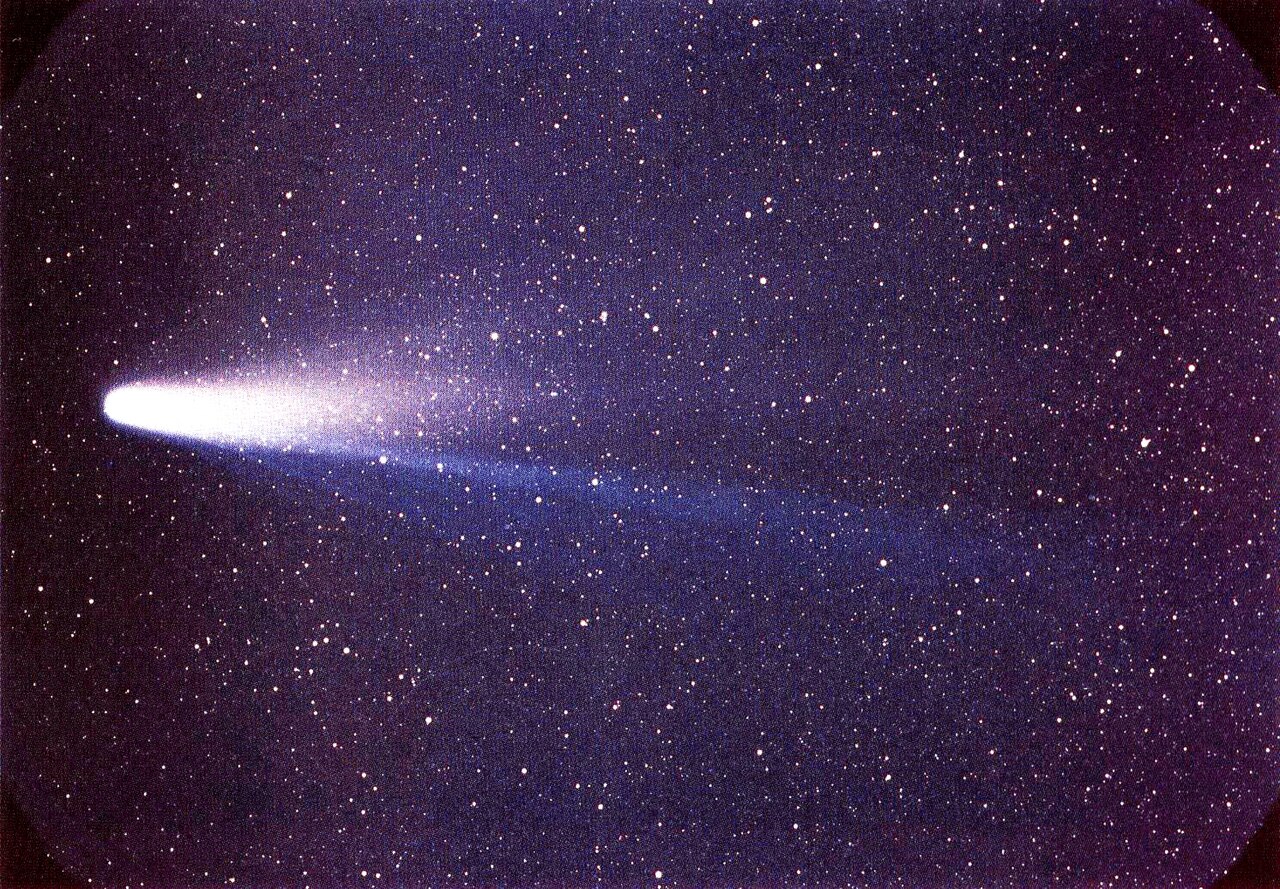
– Halley’s Comet (Figure 5), which passed by in 1986 (and will pass by again in 2061), measured a maximum of 15° (i.e., 30 times the width of the Moon).


Figure 5 – Halley’s Comet (image credit: W. Liller, Easter Island, part of the International Halley Watch IHW)


For comparison with the nearby planets in our solar system:
– Jupiter (whose diameter is about 11 times that of Earth) can reach a maximum of 50″ (or only 1/36 of the width of the Moon)
– Saturn (whose diameter is about 9.5 times that of Earth) can reach a maximum of 20″.


Credits: Teaching material for Spherical and Practical Astronomy course, Prof. Enrico Maria Corsini (University of Padua, Italy)

please, rate this post